Saturday 23 December 2017

Merry & Bright (Using Cricut® Explore Air)

Hello loves! 

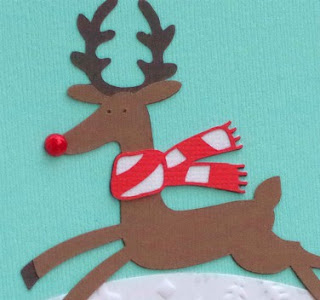
The big day is nearly upon us. Are you all ready for Christmas? I think I am, I have just enough time to post you a cute little reindeer Christmas card using the Cricut® Explore Air.


What you need...

Die-cutting machine: Cricut® Explore Air
Images: Reindeer (#M3E370) - Jolly Holidays Cartridge; Merry & Bright (#M39B28) - Winter Frolic Cartridge - Cricut®
Card: red, deep brown, mid brown, white, aqua, white embossed snowflakes
Pearls: red
Adhesives

If you don't have a Cricut® Explore then other digital die cutting machines will have reindeer and Christmas wording that you could use instead. Alternatively, you could use any manual dies that you have or even stamps.

I hope you like this adorable little card. I have another reindeer card that I'm hoping to share with you all tomorrow. Until then :o) x

Saturday 2 December 2017

Snowflake

My oh my! Where is the time going?

Hello lovelies, I'm back with another quick Christmas card. This one uses simple items that you will probably have in your craft stash.


What you need...

Die: large snowflake
Stamps: Let it Snow - Lawn Fawn
Patterned paper: snowflakes
Card stock: white
Ink pad: Onyx Black - Versafine
Gems: clear
Adhesives

As the negative from the die is used, you can keep the actual die cut snowflake for another project. This is a great project to use up scraps of paper and card, it's also very quick to make up. Perfect if you want to run off a batch. 

To give extra dimension, the die cut panel was attached to the blank with foam tape.

I hope you like this quick, simple little card, you can go wrong with snow themed Christmas cards. 

Thanks for stopping by and hopefully I'll be back soon.


Sunday 5 November 2017

Holiday Cheer Pud

Evenin' lovelies!

I'm back with another cute Christmas card. 

I love it when manufacturers include die-cut and chipboard elements to add to your paper collection. These can help you create quick and simple cards in no time. 

One of my favourite collections from Christmas 2016 was the My Mind's Eye Sugar Plum. With lovely subtle shades of red, green and pink teamed with cute images it made for a fab collection.

I've come up with a quick and cute card using some of the paper and a chipboard element.


What you need...

Paper: Sugar Plum 6x6 Paper Pad - My Mind's Eye
Elements: Sugar Plum Chipboard Elements - My Mind's Eye
Stamps: Christmas Sampler - Paper Smooches
Ink pad: Vintage Sepia - Versafine
White crochet cotton

I think if you search the internet you can still find some of this collection about. I'm so happy when manufacturers create these cute, colourful collections.

Sadly I haven't got as many Christmas cards made as I would have liked by now, but I will still try and get some done before the last Christmas posting date!

Thank you for popping by and I'll be back again soon. xx


Sunday 22 October 2017

Dashing Through The Snow

Happy Sunday peeps!

Sorry I haven't posted in a couple of weeks, but Simon and I have been on a long awaited holiday to sunny Portugal. All I can say is that it was fantastic!

More to wintry and snowy places now with a cute little Christmas card.


What you need...

Stamps: Dashing (ST-15-33) - Avery Elle
Ink pad: Onyx Black - Versafine
Copics: B02 Robin's Egg Blue, BG49 Duck Blue, C1 Cool Gray 1, C2 Cool Gray 2, E57 Light Walnut, R14 Light Rouge, RV11 Pink, RV14 Begonia Pink, Y15 Cadmium Yellow, YG23 New Leaf
Fine liner: black

After stamping the car, I added a border with the black fine liner, then I stamped the sentiment in the top right corner. Another stamp, 'Laughing all the way' is included with the set, so I stamped that inside the card.

I think this stamp set is adorable and such fun.

I will sign off for now, thank you for stopping by and I will be back soon with another festive make.


Saturday 30 September 2017

Doodle Flowers

Hello peeps!

Dark nights are coming and It's the perfect time to get out your colouring pencils/markers and do a bit of colour therapy. I remembered that I illustrated a cute little flower panel for the Jan 2017 issue of Crafts Beautiful.

Here is the sample card that I did...


What you need...

Free Doodle Flowers download
Colouring mediums
Card stock

I also designed the image with just the outlines of the flowers and border so that you can doodle in your own. You can get these free from the Crafts Beautiful website, click here to take you to the download page. You need to register to be able to download any of the templates or free papers, but it is free, quick and easy.

You don't have to make a card with the doodle, print it off several times and colour it in different colour schemes.

I'm going to head off now and make a few Christmas cards. 

Thanks for popping by! TTFN! 


Sunday 17 September 2017

Farm Photobomb

Hello lovelies, happy Sunday!

I'm back with a cheeky little card I made a while ago. I did it for a past issue of Crafts Beautiful showing the masking technique in my Master Class. It shows a group of farm animals having a photo taken with the naughty farmer photobombing the picture.

It uses stamps from one of my fave companies...Paper Smooches. 


Items needed...

Stamps: Green Acres; Alphadot - Paper Smooches
Alcohol markers: Copic
Ink pad: Onyx Black - Versafine
Masking sheets: Stamping Mask Paper - Inkadinkado
Card stock: white, pale blue

The masking technique makes the animals look like they are stood in a group. 

You do this by stamping your first image on your card, then stamp the image again onto masking paper and cut out. Make sure you cut close to the outline. Place this over the original stamped image and then stamp your next image so it overlaps the masking. When the masking is removed it will look like the second image is behind the first. 

You may need several masks depending on the design you want. This works great for foliage or flowers where you want a cluster.

Hope you like this fun little card. Thanks for stopping by, see you soon!


Sunday 10 September 2017

Cath Kidston Inspired Blanket

Happy Sunday everyone!

I'm here with something a little bit different this time. 

I recently finished a beautiful Cath Kidston inspired blanket designed by the talented Sue Morgan. It is called Cathy Come Home.


You can purchase the pattern individually for £2.05 or buy the kit which includes all the wool and the pattern for £14.80. These are available from Get Knitted (click here to take you to the online store).

I purchased the kit. The blanket was a dream to make up, the pattern easy to follow and I thoroughly enjoyed doing the pom pom edging. There was plenty of wool in the kit and I have enough left over to maybe make a matching cushion. 

The blanket measures about 100cm x 100cm which is perfect for taking on camping/caravanning trips, in the car or just at home to cover your knees when it gets a bit chilly. I've been using it folded in half as a triangle for a shawl. The wool is so soft and cosy.

Why not pop over to Get Knitted and have a look? They have lots of other beautiful blankets to choose from. I think I might be tempted to get another.

Okay, so that is me for now. Thanks for popping in!


Thursday 7 September 2017

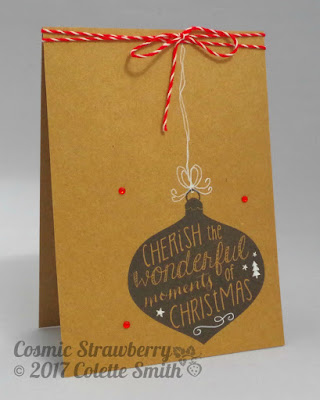
Cherish Christmas

Good afternoon lovelies!

I'm back with my first Christmas card (I've actually been making Christmas cards for the magazines since about May, but this is my personal first).

I've just finished illustrating and designing a cute little snowman card for an upcoming issue of PaperCrafter, but I can't say anymore than that at the moment.

Anyhoo, onto this make. As usual I've kept the style clean and simple, this card has a kraft base with a simple bauble.


What you need...

Stamps: Winter Sparkle CL798 - Hero Arts
Card: kraft
Ink pad: Onyx Black - Versafine
Baker's twine: red
Gems: red
White gel pen

I think the simple colour base and image give this card a cosy, Scandi feel. Looking on the Internet, you can still get this gorgeous stamp set.

I do have a few crocheted items that I've recently completed, so I may post pictures of those in the near future. In the meantime I've selected out a few goodies to make some more Christmas cards.

Thank you for popping by. TTFN!


Wednesday 30 August 2017

Happy Halloween

Afternoon peeps!

Hope you are all well! 

Today I would like to share with you the card I illustrated and made for the current issue of Crafts Beautiful (Oct 17). This was for my monthly masterclass and this tutorial is on colouring and blending with coloured pencils, with a Halloween theme.

I used Zest-it Blending Medium, this is fab for blending in the colours and removing the shine that you get when using coloured pencils.


What you need...

Digital image: Free to download from Crafts Beautiful
Card stock
Coloured pencils: Brunzeel Design
Blending Medium: Zest-It Pencil Blend
Tortillions (paper stumps)
Patterned Halloween paper
Baker's twine: orange
Adhesives

I had such fun creating this design and even better fun colouring it in. I think I may do another one with Copics and see how that one looks.

The Halloween image along with other templates from the October issue can be downloaded here. There are lots of other images, ideas, hints and tips on the Crafts Beautiful website. You will need to register to be able to download, but it is free, quick and easy to do.

Okay, that's me for now. Thank you for popping by and I'll be back soon, ttfn!


Saturday 26 August 2017

Mum

Happy Saturday!

It's Bank Holiday here in the UK so we're having a nice long weekend. So far the weather is great.

I have a card to share with you that I did for my Mum some time ago. As usual with my style it's very clean and simple.


What you need...

Stamps: Simple Flowers - Altenew
Ink pads: Aquamarine, Celery, Fizz, Lemon Grass, Magenta, Sugar Plum - Avery Elle
Masking sheets: Stamping Mask Paper - Inkadinkado
Alphabet stickers

I had some large Basic Grey alphabet stickers and I just coloured them with blank alcohol marker. Sadly Basic Grey no longer make paper craft items, it's shame as they were always one of my favourite manufacturers. Luckily I've purchased a lot of their collections in the past, some in duplicate, so it will take me some time to get through it all.

I hope you like this simple little card. Thank you for stopping by and I'll be back soon. I'm off to get out all my Christmas stock and hopefully start on some Christmas cards.


Thursday 24 August 2017

I'm back! & OMG 70?

Well hello there my lovely peeps!

After what has been over 9 months, I'm back with my dear ol' blog. I have no excuses, my mojo along with any desires and motivation just flew out the window and didn't land back here until recently.

Of course being away for so long, things had changed (such as Photobucket not allowing third party images - aarghh) and it has taken me a few days to get the gist of posting again.

So, without further ado, here is a card I made (a while ago) using one of my favourite stamp sets - Tim Holtz's Bird Crazy.


What you need...

Stamps: Bird Crazy (CM5212) - Tim Holtz; alphabet
Ink pad: Onyx Black - Versafine
Washi tape: black/grey spotty
Alcohol markers: Copic
Dies: Die-namics Say Hello - My Favorite Things
Card stock: kraft

So there he is. I've just checked on the internet and you can still get these stamps. I love them. 

This card is so straight forward and quick to do, perfect for a last minute card, especially if you want to rub in the age of the recipient - ha!

I'm going to sign off for now. I've really enjoyed getting back into blogging. Thanks for looking and I'll be back soon x